
Building a random quote machine with React Hooks and Redux
Part 10 (one before last) of the Making a random quote machine in a few different flavors series in ON.
You can read more about this project’s background on the project’s page. Or start from the beginning with part 1 of this series.
If you’re curious about the next flavors, you should subscribe to Morse Wall. I think you’ll like it a lot!
In flavor #9, I’m creating function components in a React app with Hooks and I have the data (quotes) inside a JSON file. In this flavor, I’m using global state management (with Redux) to help me update the different components with the current application state (like in flavor #4), but here I’m using React to build the UI (not manually building the UI with HTML like previously).
These are the different flavors that are part of this series:
- HTML + CSS + Vanilla JS + quotes array
- HTML + CSS + Vanilla JS + JSON with quotes (members-only post)
- HTML + CSS + Vanilla JS + quotes REST API
HTML + Vanilla JS + SAAS + quotes array(nah, because let’s be opinionated about SASS)HTML + Vanilla JS + Bootstrap + quotes array(nah, because let’s be opinionated about Bootstrap)HTML + CSS + JQuery + JSON with quotes(nah, because let’s be opinionated about JQuery)- HTML + CSS + Redux + quotes array
HTML + CSS + Redux + JQuery + JSON with quotes(nah, because let’s be opinionated about JQuery)- HTML + CSS + Redux + Redux Thunk + JSON with quotes
- HTML + CSS + React + quotes array
- HTML + CSS + React + JSON with quotes (members-only post)
- HTML + CSS + React Hooks + quotes array
- HTML + CSS + React Hooks + JSON with quotes (members-only post)
HTML + CSS + React + React Redux + quotes array(nah, because let’s be bullish about writing any new components with React Hooks)HTML + CSS + React + React Redux + Redux Thunk + JSON with quotes(nah, because let’s be bullish about writing any new components with React Hooks)- HTML + CSS + React Hooks + React Redux + quotes array (this flavor)
- HTML + CSS + React Hooks + React Redux + Redux Thunk + JSON with quotes
HTML + CSS + React Hooks + React Redux Hooks + quotes array(nah, because let’s be opinionated about React Redux Hooks)HTML + CSS + React Hooks + React Redux Hooks + Redux Thunk + JSON with quote(nah, because let’s be opinionated about React Redux Hooks)
If you are new here, you may wonder why I am overcomplicating a really simple application that can be shipped in 3 lines of functional Vanilla JavaScript. And the reason is: Shipping a simple app in a simple environment with fewer moving parts = great way to practice a new way to solve a problem. This is the spirit behind the Making a random quote machine in a few different flavors series. Enjoy!
In Part 11 (to be posted next week - the last part of this series), I will cover an eleventh flavor and will be using Redux Thunk to call an asynchronous endpoint to request the data (quotes) from an external resource (all while still building the UI with React Hooks).
If you’re curious about the next flavors and would like to make a writer very happy today, you should subscribe to Morse Wall.
Why Redux in a React application?
With Redux, I can simplify the management of the application’s state in a complex app. Simplicity comes out specially from being able to have all app state centralized in a single location (the Redux store).
Although React components can manage their own state locally, without the need of an external library (like in flavor #6 and flavor #8), as applications grow bigger, with several components, managing state that is shared across components becomes a difficult and messy task.
Having said that, as mentioned previously, this app is simple enough that it can be done solely in React. Actually, it is so simple that it can be shipped with essentially 3 lines of functional Vanilla JavaScript code (flavor #1).
Adding the React Redux library
Since Redux is not designed to work with React out of the box, I’m adding the React Redux package to let my React components read data from the Redux store, and dispatch actions to the store to update data.
The React Redux library is available from a precompiled UMD package, so I can simply add it as script to my HTML.
Like previously in flavor #4, I’m adding Redux to the project via a UMD build. The snippet below shows the bottom of my HTML.
<!-- index.html -->
	<!-- adding the React library from a precompiled UMD packages. React is the global variable to call React. -->
	<script src="https://unpkg.com/react@16/umd/react.production.min.js" crossorigin></script>
	<script src="https://unpkg.com/react-dom@16/umd/react-dom.production.min.js" crossorigin></script>
	<!-- Loading the Babel compiler. When loaded in a browser, @babel/standalone will automatically compile and execute all script tags with type text/babel or text/jsx: -->
	<script src="https://unpkg.com/@babel/standalone/babel.min.js"></script>
	<!-- adding the Redux library from a precompiled UMD package. window.Redux is the global variable to call Redux. -->
	<script src="https://unpkg.com/redux@4.0.4/dist/redux.js"></script>
	<!-- adding the React Redux library from a precompiled UMD package. ReactRedux is the global variable to call React Redux. -->
	<script src="https://unpkg.com/react-redux@7.1.1/dist/react-redux.min.js"></script>
	<!-- special text/babel MIME type -->
	<script type="text/babel" src="src/script.js"></script>
</body>
</html>
The React Redux UMD build makes React Redux available as a ReactRedux global variable.
No JavaScript modules here (again)
For the reasons I’ve detailed in flavor #6, I’m not dividing this flavor’s code into modules.
In other words, this flavor has a long JS file.
Flavor #10: HTML + CSS + React Hooks + React Redux + quotes array
In this flavor, I’m creating a Redux store that manages the state of the entire app. The React components can then subscribe to the pieces of data in the store that are relevant to them. Actions are dispatched directly from React components. These dispatched actions then ultimately trigger store updates (for more on state, check “What is state?” in flavor #4).
Actually, since much of the Redux code in this flavor remains the same as in flavor #4, it may be helpful to give that writing a quick read.
I have the data (quotes) in an array inside my script.js like previously in flavor #8.
Restructuring the React Components
Before I get into state management, I’m breaking down my large React component into smaller components. Such restructuring makes the application easier to read, maintain and grow [sic] (Because this application has so much growth potential, right?). So, I’m splitting the previously monolithic App React Component (which was large and contained a lot of functionality) into 4 components instead.
Once again, this is a simple app, but for more complex applications, not breaking down large components would make them hard to test and would easily lead to non-DRY code.
Reusable Quote Box
I’m creating a reusable quote box to handle a potential “future case” in which I’m scaling the app [sic] and want to add more screens/routes to it. I’d then reuse the same quote box, but with different text (data). I’m getting author and text values from the App component via props
//script.js
const QuoteBox = ({ text, author }) => {
  //destructuring
  return (
    <React.Fragment>
      <div className="quotable-square">
        <div className="content">
          <div id="text">{text}</div>
          <div id="author" className="author">
            {author}
          </div>
        </div>
      </div>
    </React.Fragment>
  );
};
Passing props to components
Components can be customized when they are created with different parameters. These parameters are called props (or properties) and they are used in a React application to send data from one React component to another React component. props can be considered as arguments to a function which returns JSX. The value of this “argument” can then be accessed in the function body (variable name within curly braces).
As per code snippet above, I’m getting author and text values from a parent component component. Note that I’m destructuring props by using the destructuring assignment syntax above. This allows me to clearly define my props as they get passed from a parent to a child component and get rid of the props word in the component’s definition.
The parent component (App), as per below code snippet, passes text and author values to the Quotebox component.
In this specific case (of a React Redux application), there is obviously some more to it, since the parent component (App) is having props passed to it. This is because Redux is passing state to App via props (more on this further down). That said, the dynamics of passing data from a parent component to a child component are as simple as per snippet above and below.
//script.js
//defining the function component. Redux state and dispatch are passed to the component as props
const App = props => {
  ...
  //the component returns JSX, and as per code snippet below, JSX clearly represents HTML, composing the UI. As a React component can only return one single element, I’m using <React.Fragment> to add a parent tag to my JSX elements without adding an extra node to the DOM.
  return (
    <React.Fragment>
      <div className="container">
        <div id="quote-box">
          {/* passing data via props to QuoteBox component */}
          <QuoteBox
            text={props.currentQuote.data.quoteText}
            author={props.currentQuote.data.quoteAuthor}
          />
        </div>
      </div>
      <footer>
        <ul className="footer-options">
          <li className="footer-link">
            <a href="#" className="footer-linktext">
              Legal
            </a>
          </li>
          <li className="footer-link">
            <a href="#" className="footer-linktext">
              Contact Us
            </a>
          </li>
        </ul>
        <span>© 2019 Developed by Pat Eskinasy. All Rights Reserved.</span>
      </footer>
    </React.Fragment>
  );
};
Reusable Button
I’m creating a reusable button to handle a potential “future case” in which I want to have two buttons, instead of having only one “New Quote” button. For instance: one for Next Quote and one for Previous Quote.
// script.js
const Button = ({ onClick, title }) => {
  return (
    <button className="new-quote" onClick={onClick}>
      {title}
    </button>
  );
};
Reusable Share Button
Finally, I’m creating a reusable share button to handle a potential “future case” in which I want to add additional social share buttons, instead of only one “Tweet Quote” button. These buttons would then share the same styling, but receive different props.
//script.js
const TwitterShare = ({ link }) => {
  return (
    <React.Fragment>
      <button className="tweet-quote">
        <a
          href={link}
          target="_blank"
          title="Tweet this on Twitter"
          id="tweet-quote"
        >
          <em className="fab fa-twitter"></em>Tweet Quote
        </a>
      </button>
    </React.Fragment>
  );
};
Redux and initial state
From the user stories, I want to be welcomed by a quote when I first load the app. In other words, I want to be able to read the quote from the Redux store on first page load.
So far, however, I haven’t even set up the Redux store yet.
// script.js
// The UMD build makes Redux available as a window.Redux global variable
const Redux = window.Redux;

//defining initial state
const initialState = {
  data: quotes[Math.floor(Math.random() * quotes.length)],
};

//defining an action type
const NEW_QUOTE = "NEW_QUOTE";

//defining an action creator, which creates the action to select a new quote.  The action creator is a function that returns an action (object that contains information about an action-event that has occurred). It creates the action to add a new quote.
const newQuoteActionCreator = (quoteObject) => {
  return {
    type: NEW_QUOTE,
    payload: quoteObject,
  };
};

//creating a reducer that handles the state for quotes. The redux state is initially set to an empty object. The reducer adds a quote to the object of quotes held in state or return the current state.
const getNextQuoteReducer = (state = initialState, action) => {
  switch (action.type) {
    case NEW_QUOTE:
      return {
        ...state,
        data: action.payload,
      };
    default:
      return state;
  }
};

//creating the Redux store and passing the reducer to it
const store = Redux.createStore(getNextQuoteReducer);
Disclaimer: Use of switch...case in reducers
switch...case statements are great to show how the internals work but aren't typically used in production. You can use any conditional logic you want to write a reducer.
Nearly all code in the snippet above follows the Redux logic implemented in part 4 of this series - action events section and just like previously, I’m making the initial state (initialState) a selected random quote.
App still can’t read state from the Redux store though. This is because Redux still hasn’t been connected to React and no props are being passed to App yet.
In a Redux application, I’d normally create UI listeners that would dispatch actions to the Redux store. Then, I’d create store listeners which would be called whenever a new state is set in the Redux store. Once again, it may be helpful to give flavor #4 a quick read.
In a React Redux application, however, the execution flow is a bit different.
A visual look into the application’s execution flow
In summary, I’m changing the state in the Redux store with random quotes that get selected as the application runs. Redux updates the store with help from an action creator, a reducer and the React Redux API.
On high-level, data flows in a similar way to part 4 of this series - Execution flow in a Redux application: Different React components, such as the Get New Quote button, trigger state changes in the Redux store (with a new random quote) and a React component next updates the UI with the new state.
In a diagram (more on the React Redux methods further down):
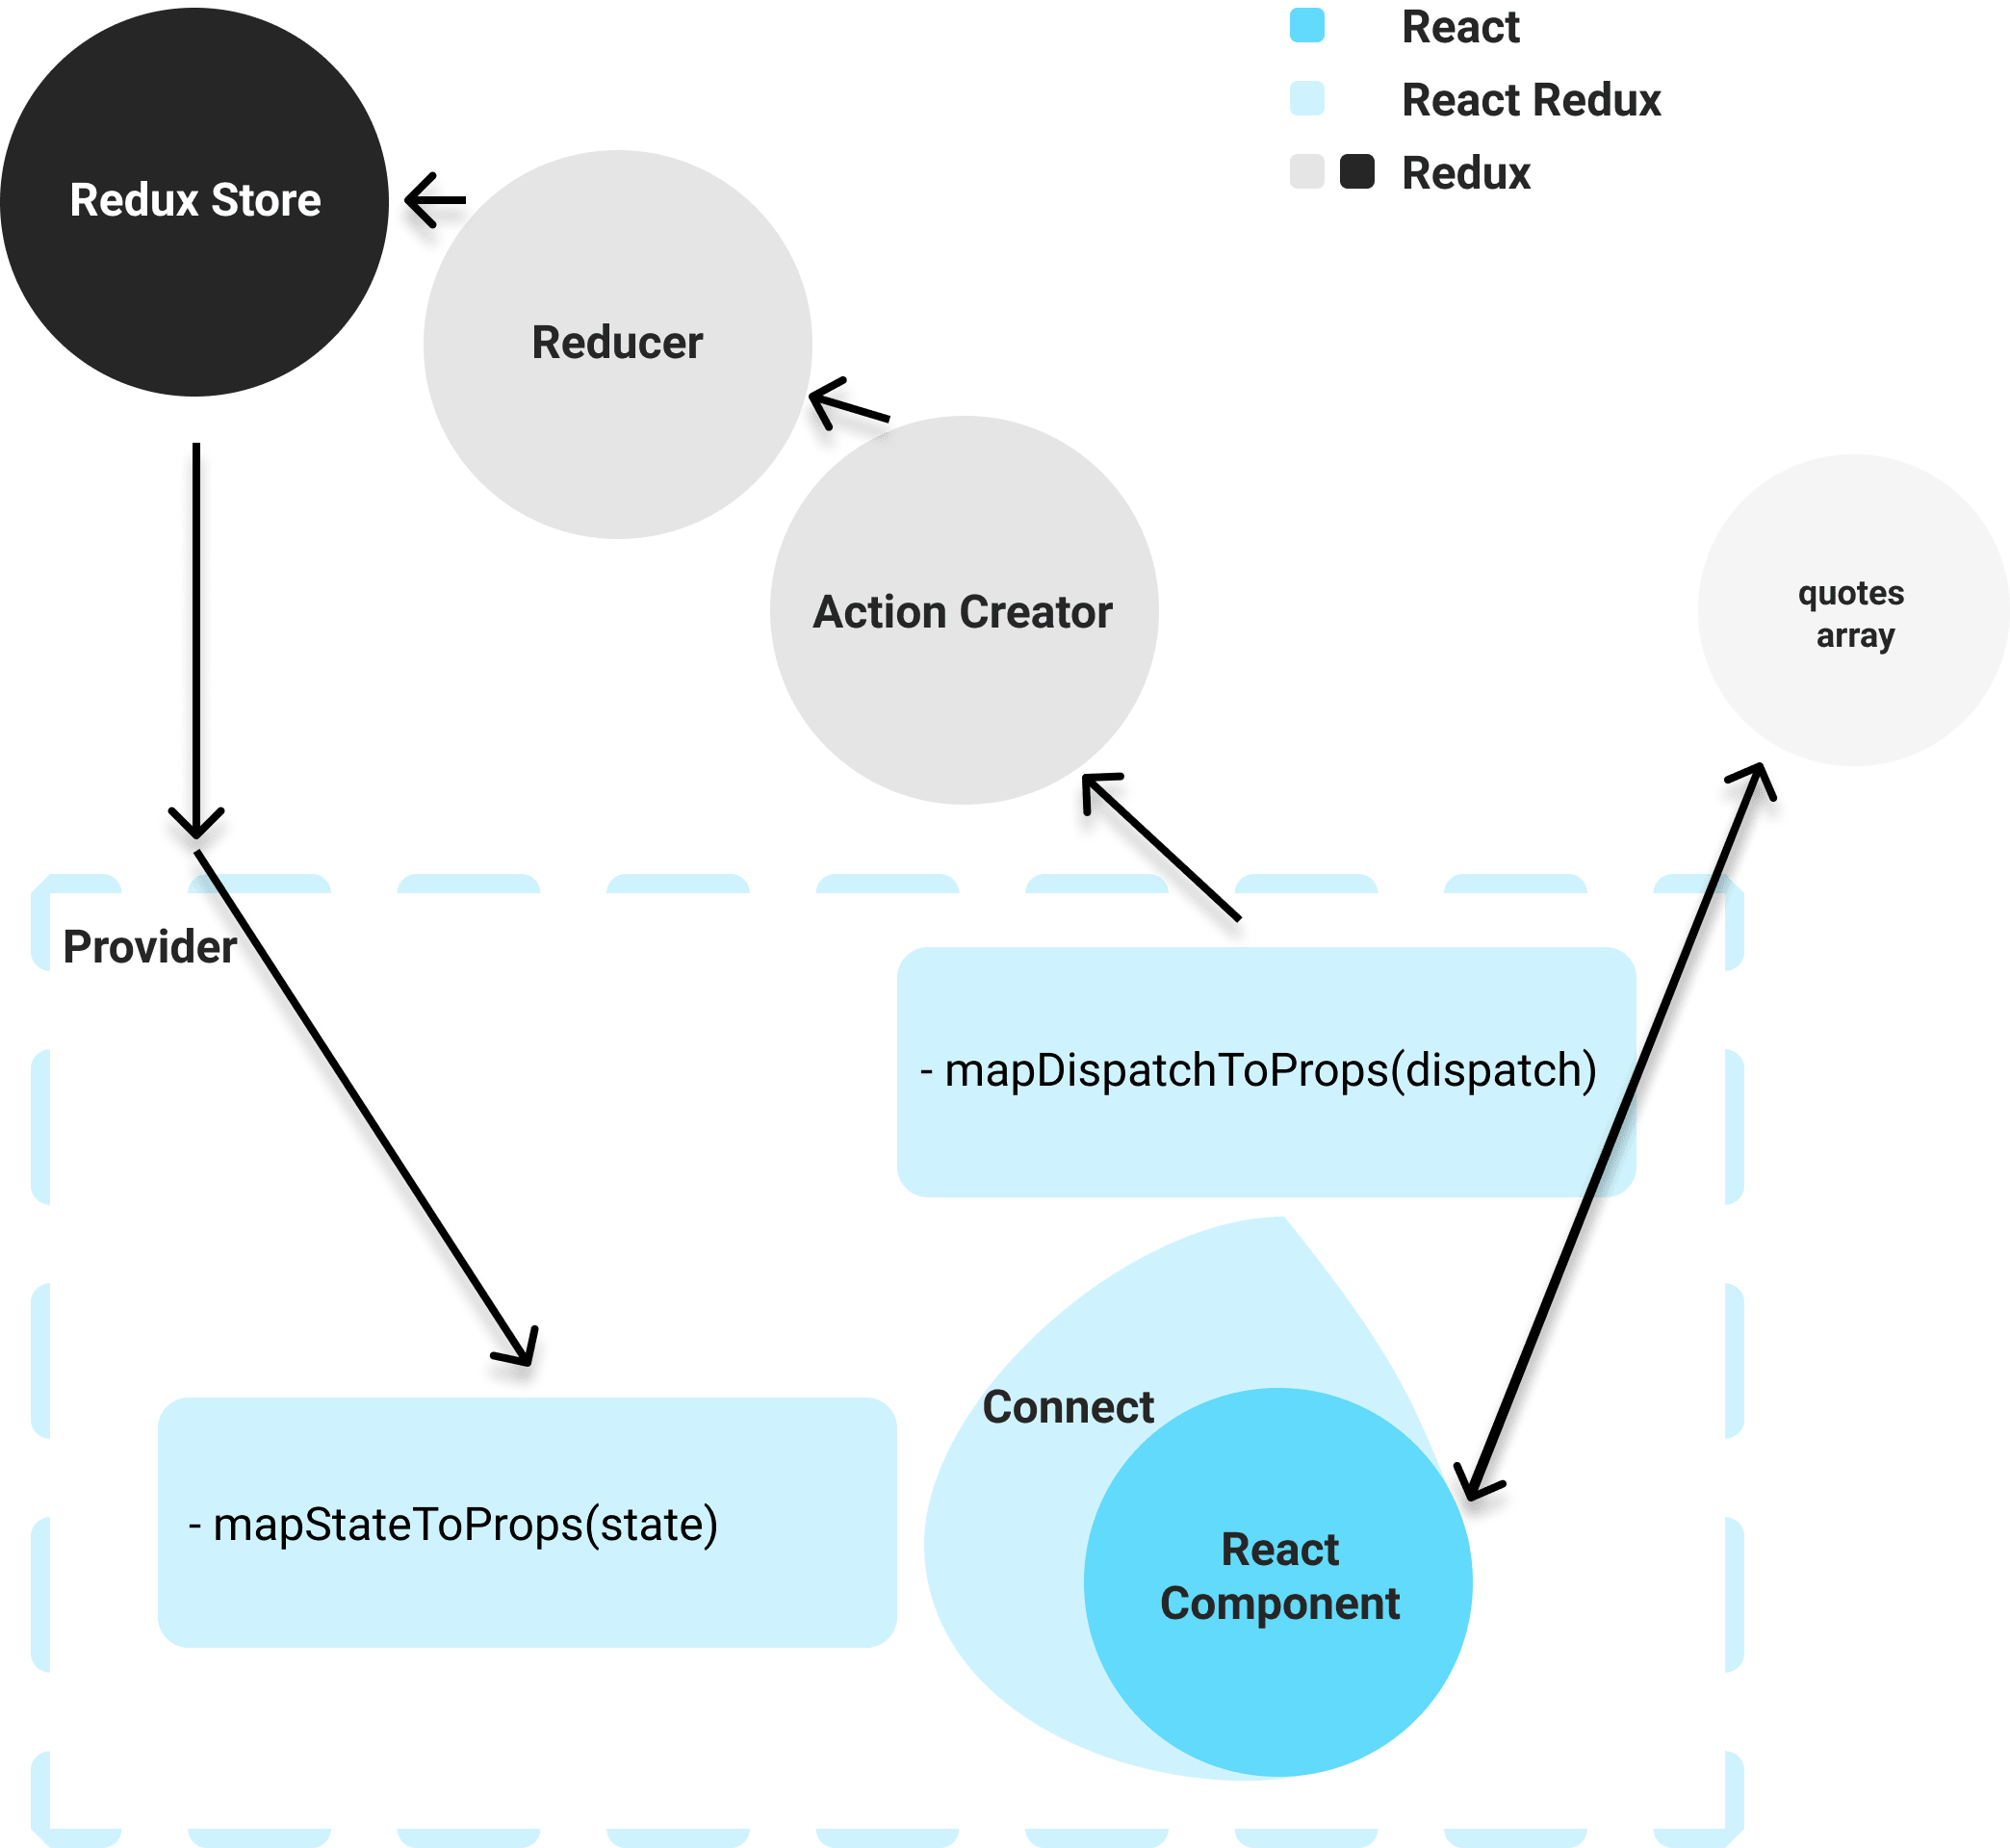
React Redux API
The React Redux package provides an API that allows me to provide React access to the Redux store and the actions it needs to dispatch updates. This API offers two key features: <Provider /> and connect().
I, however, need to specify what state and what actions I want. This is to make sure that each React component will only access the state it needs and actions it should have access to. To achieve this, I’m defining two functions: mapStateToProps and mapDispatchToProps.
Disclaimer: React-Redux Hooks API and connect()
You may have noticed that flavors using React-Redux hooks have been crossed out from the list of flavors covered in this 11-part series. This is mainly due to me (at time of writing), being opinionated about React-Redux hooks since code becomes harder to test given the tighter coupling between the React component and Redux.
(Update 2021 I: The recommendation is now that using the React-Redux hooks API should be the default approach in your React components).
The existing connect API, however, still works and will continue to be supported.
(Update 2021 II: The intention with this series is to get very incremental progress from one stack to another. Making it all as much bare bones as possible in order to get concepts adequately explored and explained. For this reason, I've covered the Redux core library (unopinionated - let's you decide how to handle everything) in the flavors covered in this series. That said, Redux Toolkit is now intended to be the standard way to write Redux logic and the recommendation is for it to be used).
mapStateToProps
Defining mapStateToProps:
//script.js
//mapping state to props. Allows me to specify exactly what pieces of the state should the React component have access to. Taking state as argument, it returns an object which maps that state to specific property names. These properties will become accessible to the React component via props
const mapStateToProps = (state) => {
  return {
    currentQuote: state,
  };
};
mapStateToProps is called every time the store state changes. It receives the entire store state and returns an object of data the component needs. It maps that state to specific property names (in this case currentQuote). These properties are then accessible to my React component via props (with the help of connect()).
mapDispatchToProps
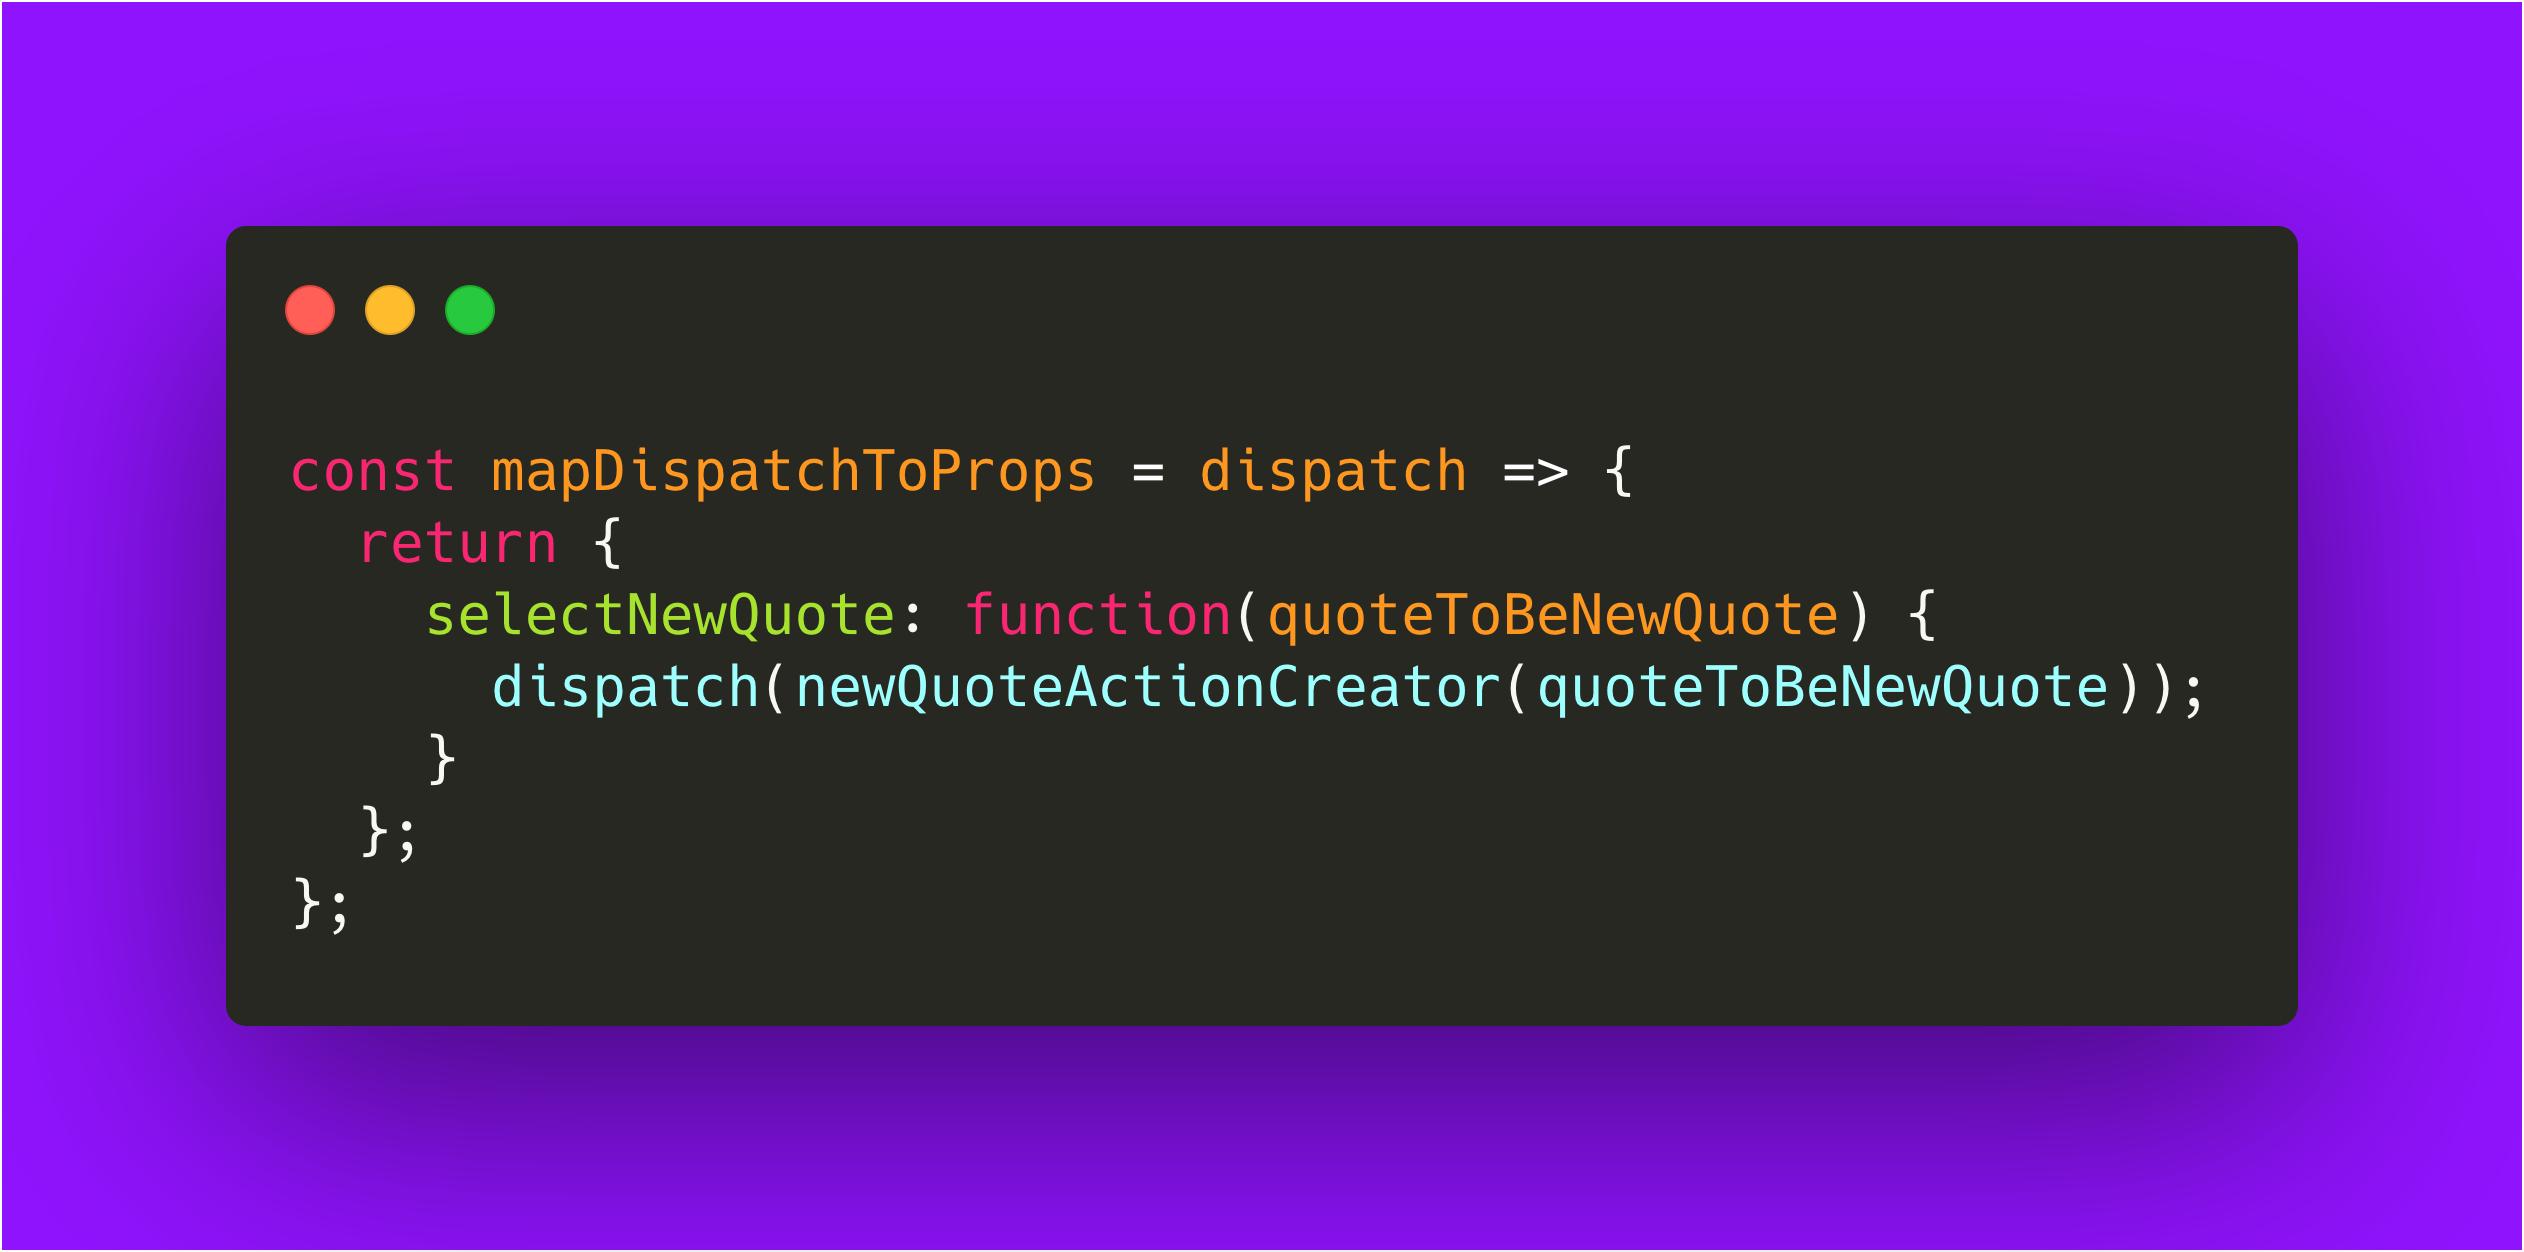
Defining mapDispatchToProps:
//script.js
//mapping dispatch to props. Specifying what actions should the React component have access to. Allows me to specify which action creators I need to be able to dispatch. It is used to provide specific action creators to the React components so they can dispatch actions against the Redux store. It returns an object that maps dispatch actions to property names, which become component props. As opposed to mapStateToProps (that returns a piece of state), here each property returns a function that calls dispatch with an action creator and any relevant action data. I have access to this dispatch because it's passed in to mapDispatchToProps() as a parameter when I define the function, just like I've passed state to mapStateToProps(). The object should have a property selectNewQuote set to the dispatch function, which takes a parameter for the new quote to add when it dispatches newQuoteActionCreator().
const mapDispatchToProps = (dispatch) => {
  return {
    selectNewQuote: function (quoteToBeNewQuote) {
      dispatch(newQuoteActionCreator(quoteToBeNewQuote));
    },
  };
};
dispatch is a function of the Redux store. In Redux, I’d call store.dispatch to dispatch an action. This would be, in the Redux case, the only way to trigger a state change.
With React Redux, mapDispatchToProps lets me create functions that dispatch when called. Then, with the help of connect(), I can pass those functions as props to my React component.
mapDispatchToProps receives dispatch and returns an object that maps dispatch actions to specific property names (in this case selectNewQuote, which I will be calling inside my React component further down). These properties are then accessible to my React component via props (through connect()). Each property returns a function that calls dispatch with an action creator (in this casenewQuoteActionCreator) and any relevant action data (here, a randomly selected quote).
connect()
The connect() method from React Redux allows me to map state and dispatch to the props of a React component. It connects a React component to the Redux store. It provides its connected component with the pieces of the data it needs from the store, and the functions it can use to dispatch actions to the store (with the help of mapStateToProps and mapDispatchToProps).
//script.js
//setting React Redux connect to a constant.
const connect = ReactRedux.connect;

//connecting Redux to React. Mapping state and dispatch to the props of the React component. Container then represents the connected component.
const Container = connect(mapStateToProps, mapDispatchToProps)(App);
<Provider />
In React Redux, connect attempts to get the store from the <Provider />. The <Provider /> wraps my React application. It allows my React app to access the Redux store (providing state) and dispatch function throughout my React component. The Redux store is passed as a prop to <Provider />.
//script.js
//using Provider to connect redux to react. Allows me to provide state and dispatch to React components. Setting React Redux Provider to a constant.
const Provider = ReactRedux.Provider;

//defining the Provider wrapper. Allows me to access the Redux store and dispatch functions. Finalizing connecting the Redux store with the React component, thereby extracting the local state into the Redux store. Provider wraps the React app and allows me to access the Redux store and dispatch actions throughout the React component. The Redux store is passed as a prop to the Provider.
const AppWrapper = () => {
  return (
    <Provider store={store}>
      <Container />
    </Provider>
  );
};
With the above in place, App can now read state from the Redux store and it now becomes clearer why I’ve mentioned further above that the parent component (App) needs props passed to it (because Redux is passing state - and dispatch - to App via props).
By now, my application can render a random quote on the screen upon first page load. And with this, I have shipped the first user story.
React Dispatching Actions
I still need to ship user story #2: I want to be able to click a UI element (a button) to get a new quote. To achieve this, I’ll need to dispatch an action from my React component.
When the Get New Quote button is clicked, React calls chosenRandomQuoteToState, which calls selectNewQuote (see mapDispatchToProps above), as it has been passed as props to App. Now, provided the specific action creator (newQuoteActionCreator, coming from mapDispatchToProps), the React component can dispatch actions against the Redux store and update the state.
//script.js
const App = props => {
  ...
  const random = array => {
    return Math.floor(Math.random() * array.length);
  };

  const randomQuoteFunction = array => {
    return array[random(array)];
  };

  //defining a function to (ultimately) update the Redux state with a new quote. Passing a randomly selected quote via props. Dispatching selectNewQuote() from props and passing in the randomly selected new quote as an argument
  const chosenRandomQuoteToState = () => {
    //selecting a random quote from the array
    let chosenQuote = randomQuoteFunction(quotes);
    props.selectNewQuote(chosenQuote);
  };

  //the component returns JSX, and as per code snippet below, JSX clearly represents HTML, composing the UI. As a React component can only return one single element, I’m using <React.Fragment> to add a parent tag to my JSX elements without adding an extra node to the DOM.
  return (
    <React.Fragment>
      <div className="container">
        <div id="quote-box">
          {/* passing data via props to QuoteBox component */}
          <QuoteBox
            text={props.currentQuote.data.quoteText}
            author={props.currentQuote.data.quoteAuthor}
          />
          <div className="actions">
            <Button
              id="new-quote"
              title="Get New Quote"
              onClick={chosenRandomQuoteToState}
            />
          </div>
        </div>
      </div>
      <footer>
        <ul className="footer-options">
          <li className="footer-link">
            <a href="#" className="footer-linktext">
              Legal
            </a>
          </li>
          <li className="footer-link">
            <a href="#" className="footer-linktext">
              Contact Us
            </a>
          </li>
        </ul>
        <span>© 2019 Developed by Pat Eskinasy. All Rights Reserved.</span>
      </footer>
    </React.Fragment>
  );
};
And just like previously (in the case of first page load), App reads state from the Redux store (given Redux is passing state to App via props) and the newly selected random quote will render on the screen.
The GIF below shows state changing in the application as I request a new quote with the Get New Quote button.

As a note, to track state (as per gif above), and as previously done in flavor #4, I use Redux DevTools Extension to time travel in the application’s state. The extension records dispatched actions (more on dispatched actions below in the article) and the state of the Redux store (more on the store further down) at every point in time. This allows me to inspect the state and travel back in time to a previous application state without reloading the page.
Building the UI - The Parent Function Component
Defining App, the function component, now in full:
//script.js
// defining the function component. Redux state and dispatch are passed to the component as props
const App = (props) => {
  //making the machine tweet
  let twitterLink;

  let quoteTextElem = props.currentQuote.data.quoteText;
  let quoteAuthorElem = " - " + props.currentQuote.data.quoteAuthor;
  let contentQuote = quoteTextElem + quoteAuthorElem;
  if (contentQuote.length > 280) {
    let charCountAuthor = quoteAuthorElem.length;
    const extraStylingChar = "..." + '"';
    let extraCharCount = extraStylingChar.length;
    let subString =
      quoteTextElem.substring(0, 280 - extraCharCount - charCountAuthor) +
      extraStylingChar +
      quoteAuthorElem;
    //generate url available for Twitter intent and inject url on HTML
    twitterLink = "https://twitter.com/intent/tweet?text=" + subString;
  } else {
    //generate url available for Twitter intent and inject url on HTML
    twitterLink = "https://twitter.com/intent/tweet?text=" + contentQuote;
  }

  const random = (array) => {
    return Math.floor(Math.random() * array.length);
  };

  const randomQuoteFunction = (array) => {
    return array[random(array)];
  };

  //defining a function to (ultimately) update the Redux state with a new quote. Passing a randomly selected quote via props. Dispatching selectNewQuote() from props and passing in the randomly selected new quote as an argument
  const chosenRandomQuoteToState = () => {
    //selecting a random quote from the array
    let chosenQuote = randomQuoteFunction(quotes);
    props.selectNewQuote(chosenQuote);
  };

  //the component returns JSX, and as per code snippet below, JSX clearly represents HTML, composing the UI. As a React component can only return one single element, I’m using <React.Fragment> to add a parent tag to my JSX elements without adding an extra node to the DOM.
  return (
    <React.Fragment>
      <div className="container">
        <div id="quote-box">
          {/* passing data via props to QuoteBox component */}
          <QuoteBox
            text={props.currentQuote.data.quoteText}
            author={props.currentQuote.data.quoteAuthor}
          />
          <div className="actions">
            <Button
              id="new-quote"
              title="Get New Quote"
              onClick={chosenRandomQuoteToState}
            />
            <TwitterShare link={twitterLink} />
          </div>
        </div>
      </div>
      <footer>
        <ul className="footer-options">
          <li className="footer-link">
            <a href="#" className="footer-linktext">
              Legal
            </a>
          </li>
          <li className="footer-link">
            <a href="#" className="footer-linktext">
              Contact Us
            </a>
          </li>
        </ul>
        <span>© 2019 Developed by Pat Eskinasy. All Rights Reserved.</span>
      </footer>
    </React.Fragment>
  );
};
The code to make the machine tweet (in snippet above inside App) is very much in line with what has been implemented in all previous flavors of this project. In other words, the code here follows the logic implemented in part 1 of this series.
So now the random quote machine ships all the required user stories!
You can check the project live. Source code for flavor #10 in Github.
Acknowledgement
The following goes without saying, but here it comes anyways: Please note that in this ever changing world of technology, I am writing this article in July 2019 (hello, summer!) and alternate solutions might have become available as you read this writing.
In Part 11 (to be posted next week - the last part of this series), I will cover an eleventh flavor and will be using Redux Thunk to call an asynchronous endpoint to request the data (quotes) from an external resource (all while still building the UI with React Hooks).
If you’re curious about the next flavors, you should subscribe to Morse Wall. I think you’ll like it a lot!
So, what did you like about this post? Come say hello on Twitter!
Why I am overcomplicating a really simple application that can be shipped in 3 lines of functional Vanilla JavaScript. Reason: Shipping a simple app in a simple environment with fewer moving parts=great way to practice a new way to solve a problem
— Pat's Morse Wall (@morsewall) September 15, 2021
Part 10 of a 11-part series out pic.twitter.com/WL6hVSOJDE
Also, if you have built a random quote machine after reading this post, share it as comment to the tweet above on Twitter. Really excited to see what you create!
Happy coding!
Where to find me:
Follow me on Twitter:

You can always get my latest writings directly to your email address by subscribing to Morse Wall.
UPDATE
Part 11 of this series has now been published. Go check it out!. I continue using Redux to help me update the different components with the current application state, but the app is using Redux Thunk to call an asynchronous endpoint as the data (quotes) is requested from an external resource (a JSON stored in a public content delivery network (CDN)) (like in flavor #5). This time, however, I’m using React to build the UI (not manually building the UI with HTML, like previously) in the eleventh (and last) flavor.
 by Pat